Here’s how to give your Android phone a huge speed boost, just like Apple sped up iOS 7.1..
Apple released its eagerly anticipated iOS 7.1 update last week and while the new software added a bunch of great new features and cleaned up a few annoying bugs, there is one thing in particular that stands out as the best thing about iOS 7.1: the speed improvements. Apple’s new iOS 7.1 software is incredibly fast on iPhones and iPads, and the difference completely changes the user experience for the better. But why should iPhone users have all the fun?
With a few simple adjustments to three settings, you can enjoy the same great speed improvements on your Android smartphone or tablet.
One of the many great things about Android is its flexibility. Google’s mobile software is open to all kinds of third-party tweaks and enhancements, but it also has some built-in features that savvy owners can take advantage of to change the user experience. One such feature allows Android device users to dramatically speed up the transition animations that display when they switch apps and when windows open and close.
The tweaks are available within the settings of all recent Android phones in a section called “Developer options.”
This section might be hidden on some phones, but it’s very easy to access. On many phones, you just have to open a certain page in the settings and tap a button seven times. Use Google to figure out how to enable Developer options on your phone if it’s currently hidden (for example, search “enable developer options HTC One”).
Once you have access to Developer options, simply scroll until you find the following three settings, which may be located on the main screen or within an “Advanced” subsection:
Window animation scale
Transition animation scale
Animator animation scale
Tapping each of the three aforementioned settings will reveal that it’s set to “1x” by default. If you want to speed up your phone or tablet dramatically, simply change each of those three settings to “.5x” — that’s it.
Want to quickly change the look of your home screen (and some applications) without too much work? Change the theme! In Sense 6, HTC has provided four themes to choose from. While the selection is lacking, you can change from a cool blue-green theme to something with warmer reds, purples, or even a dark grey theme.
To change your theme, simply go into your settings and hit Personalize, then tap on Themes. Select the theme you’d like to use, press Apply, and you’re good to go.
Lock screen shortcuts
The HTC One allows users to quickly jump into certain applications right from the lock screen. Out of the box, these applications include the essentials, like the phone, messaging, browser, and camera apps. Luckily, it’s easy enough to customize these applications, but there’s a bit of a restriction.
The four docked icons at the bottom of your home screen are the same as those found on your lock screen. This isn’t a coincidence. In fact, the only way you can change the lock screen shortcuts is to change the docked home screen icons. This can be done by long-pressing on the app you’d like to replace and dragging it to the remove link that appears at the top of the display. Don't worry, it doesn't delete the app, it just removes it from your home screen. After that, you can replace the empty slot with any application you choose and it will reflect on your lock screen.
BlinkFeed tweaks
HTC now offers up even more content for BlinkFeed, bolstering the selection we saw on previous versions of Sense.
You’ll also be able to create custom topics, so you can get as specific as you’d like. Just type in a subject you'd like to see content about and BlinkFeed will find news posts, YouTube videos, tweets and more.
If you want to free up that extra panel and rid yourself of BlinkFeed, that’s also an option. HTC makes this simple to do, too. To kill off BlinkFeed, all you’ll need to do is long press on an empty space on the home screen and select Manage home screen pages. Swipe to the BlinkFeed panel, and tap on Remove at the bottom of the display. Done and done.
If you want to keep BlinkFeed but don’t want to see it every time you unlock your phone, you can change this, too. By going back to the Manage home screen panel pages screen, you can swipe to whatever panel you’d like to see when you unlock your phone and tap on Set as home on the bottom of the screen. Now that will be the first screen you see.
Move your home screen panels around
You might want to have your home screen set up just the way you like it. For example, I always have my twitter widget to the left of my main home screen and my bookmark widget to the right. If you want to give yourself some space from Blinkfeed, it's simple enough to do.
From anywhere on the home screen, simply use a two-fingered pinch gesture, which will "zoom out" your home screen and show all available widgets below and your home screen pages at the top. You can now re-position panels (with the exception of BlinkFeed) by long-pressing on the panel you’d like to move and dragging it to the desired location.
Unlock your phone the right way. Or the left way.
Building upon the LG G2’s Knock On feature, HTC has gone a bit further with the M8. Not only can your double-tap the screen while it is locked to wake the device from sleep (and double-tap again to put it back to sleep), you can also swipe it to get around more quickly.
While your phone is asleep, a quick swipe to the right launch will launch BlinkFeed. Swiping to the left will unlock the phone and take you directly to your home screen. Swipe up from the bottom edge of the display to go to your last opened app, and swipe down from the top of the screen to launch voice dialing.
The implementation works well, but it’s a little disappointing to see that these applications/gestures can not be customized in any way.
Quick camera access
Want a faster way to get to your camera app without unlocking the your phone? While your HTC One is in its locked, sleeping state, you can easily jump into the camera by holding the device in landscape view (sideways) and holding down one of the volume keys. This will launch the camera app and let you take new photos or videos, but don't worry, your content is safe—viewing previously-taken pics requires you to unlock your phone.
Don’t forget HTC’s Getting Started Guide
Don’t know where to start with your new HTC One M8? HTC provides an optional “getting started” guide that should help ease you into your new phone’s capabilities. You’ll be able to customize your phone with apps, feeds, and more right from your computer.
You’ll be able to access the Getting Started guide during the initial setup of the phone, where you’ll be prompted to go to the website https://start.htc.com/pair. Simply type in your unique code into the site and you’ll be up and running in no time.
Save your own custom settings as a Camera
Among the many features found on the camera, there is one that many will find incredibly useful, and it’s the ability to save customized settings as a camera. What does that mean? Well, if you want to keep your ISO set at a certain level at all times or you always want HDR photos when using the camera, the HTC One allows you to change those settings and save it as a new camera mode. This way, you can jump into the Camera app and take photos without wasting precious seconds on fiddling with white balance and other settings.
Launch Camera and tap on the three dots on the top left (bottom left if in landscape) to access the settings. From there, you can tweak the effects just the way you like them. After you’ve adjusted the settings, tap on the cog-like icon and scroll down until you you see the Save as camera option. You can even give this camera its own name, like "high-ISO no flash."
Prioritize quick settings
Quick settings can be accessed by dragging down the notification panel and tapping the icon on the top right of the screen. Alternatively, you can also use two fingers to drag the panel down to immediately reveal the quick settings.
The quick settings options are rather busy, and there are some you may never use. To clean up these settings, simply tap on the edit icon at the top of the screen, which is depicted as a piece of paper and pencil. You’ll then be presented with the option to edit your quick settings.
To change the positions of your quick settings, simply tap and hold the icon to the right (three lines) and drag the panels up or down as you see fit. Moreover, you can drag a panel down past the “hidden items” section to keep it from showing at all.
Use the M8 to control your TV
Like its predecessor, the HTC One M8 ships with an IR blaster that allows you to control your TV. The setup is relatively painless, and the application itself is slick and well-designed. You no longer need to worry when your lose your TV remote.
Head into your app drawer, tap on the TV icon, and follow the prompts to set up the phone to work with your make and model of TV. It even controls some other A/V gear, like receivers. Don't miss out on this feature!
Show battery percentage in the status bar
A simple feature that’s not turned on by default is the option to show the percentage of remaining battery life in the status bar. In addition to the usual vague icon, you’ll be able see exactly how much juice you have left on your phone. It’s a helpful feature, but might add a little clutter to your status bar.
Go to Settings, scroll down to Power, and check the box next to Show battery level.
Change app drawer grid size
HTC decided to change the default grid size to 3 x 4 in the app drawer for the One. This requires the user to scroll through more pages to get through the same amount of applications. This can be changed to a 4 x 5 grid by tapping the three dots on the top right while inside the application drawer and selecting Grid size.
Do not disturb
Tired of your phone beeping and blinking from notifications in the middle of the night? There are apps in the Play Store to prevent that, but the HTC comes with a Do not disturb feature built-in. When you turn it on, it prevents the phone from making any sound, or vibrating, or the LED from blinking.
Just head to the Settings, then Sounds and select Do Not Disturb from the list. You can set a schedule to make DND turn on and off at selected times and days, and "whitelist" certain contacts to make sure you still get calls and texts from them. It's really quite flexible.
Android is stacked with so many tools and configuration options, we often overlook some of its most useful features. Sometimes they’re hiding in plain sight. Other times, they’re buried so deep, you’d never discover them without spelunking deep into submenus, groping blindly in the dark.
But don’t let that one killer feature get away. Even if you consider yourself an Android power user, you’d do well to make sure you’re familiar with every single menu, toggle and utility on this list. We’ve done our best to identify the precise locations of the features listed below, but you may have to hunt around menus a bit if your device manufacturer has excessive interface customizations.
Did we leave out that one killer, secret feature that everyone should know about? Let us know by officially submitting a tip to Greenbot. We’ll give you direct credit if we use your submission.
Use Android Device Manager for remote security
Use Android Device Manager for much greater control over a lost phone.
The Google Play Services framework is used to manage all sorts of back-end services, and Google updates it frequently in the background. Most of the functionality packed away in this framework is of little user-facing consequence, but there’s a lot including account sync, malware scanning, and the Android Device Manager. This feature allows you track, ring, lock, and wipe your device if you lose track of it.
By default, you can only ring and locate a device with Android Device Manager, so if you want the full gamut of features, go into your main system settings and scroll down to Security. Find the Device Administrators option, and open it to see what apps have been granted admin privileges on your phone or tablet. Checking the box next to Android Device Manager allows you to wipe and lock the device in addition to the ring and locate features.
You can remotely access Android Device Manager in a number of useful ways. If you only have one Android device, you can use any web browser to go to theAndroid Device Manager page and log into your account. From there, you can see a map of where your phone is located, and issue commands to nuke it or just lock it.
Before resorting to extreme measures, you might want to start with locating and making it ring to ensure it didn’t just slip between the couch cushions. Should you have access to more than one Android device, you can use the Android Device Manager app, which you can keep on all your devices to locate and manage the others.
Screen Recording
Screenshots are for chumps. Show everyone else what you’re up to with a screen recording.
A subset of Android users over the years have resorted to rooting their devices to get more advanced features. Android has slowly gained features over time that make root less of a necessity. As of Android 5.0 Lollipop, there’s less reason than ever to root now that Android supports screen recording. You just need an app to take proper advantage of it.
A screen recording is simply an MP4 video file of what’s happening on your screen for the duration of the capture. There is no native tool to do this on most Android devices for some reason, but there are a ton of them in the Play Store. My personal favorite is the aptly named Rec.
Whether you’re using Rec or another app with support for Lollipop screen recording, all you need to do is accept the screen capture request when it pops up. An icon in the status bar will appear to let you know the screen recording is ongoing. Some apps have support for different resolutions and bitrates for the recording as well, but the default will be the native screen resolution of your phone or tablet.
The way you end a recording varies by app, but there’s usually a notification or you can simply put the device to sleep. One of the reasons I prefer the aforementioned Rec is that it has support for both of those options as well as shake to stop a recording.
Set your system animations to warp speed
Why suffer even marginally slow animations when your processor can handle faster speeds?
Newsletter
Get the latest news, trends, apps, and tips for your Android phone.
Get our Greenbot download newsletter
Android devices are faster than they used to be, but you can make your experience feel even zippier with one simple tweak. Android contains a hidden developer options menu that you can enable by going into your main system settings, then navigating to About > Software Information > More > Build number. Now tap on the build number—literally, tap on it numerous times—until a small message at the bottom of the screen confirms that you’re a developer.
Now, don’t worry: This doesn’t make any modifications to your system. It just turns on the Developer Options menu back in the main settings list—so head back there and open it up. Developer Options has a ton of interesting features to play around with, but you can also mess things up pretty badly, so it’s best not to change anything you haven’t thoroughly researched. You’ve been warned!
Now back to animations. Inside Developer options, scroll down to Drawing and find Window animation scale, Transition animation scale, and Animator duration scale. These are all set to 1x by default. These animations are the eye candy you see when apps open and close, menus drop down, and more. They help cover up lag as the system catches up, but you don’t really need slow settings on a fast device. You can set all of these to 0.5x for a more snappy interface experience.
Keeping your phone secure is important, but if you’re the one holding it, there’s no reason you have to deal with a strong lock screen every single time you drag it from your pocket. Luckily, Android 5.0 devices now have support for Smart Lock. This feature can display the easy swipe lock screen when it’s safe to do so. How does it know? Well, there are a variety of options, some more secure than others.
Smart Lock is delivered to devices via Play Services, just like Android Device Manager. The locking options will vary by device, but Nexus phones and tablets have the most. There’s Trusted Face, Trusted Location, Trusted Devices, and on-body detection. At the bare minimum, all devices should have Trusted Devices and Trusted Location.
So for example, you can have your phone set to swipe unlock at home, but take a stroll down the block or hop in the car and it will start asking for the pattern, PIN, or password lock again. The same goes for Trusted Devices—if you’re connected to a Bluetooth or NFC device you have previously marked as “trusted,” (like your car or Android Wear watch) you’ll see no secure lock screen. With Trusted Face, the device will switch seamlessly transition to swipe unlock mode if it spots you with the front camera. On-body detection is a little weird—this option keeps your phone set to swipe unlock as long as it detects it is still in your hand or pocket. Set it down, and it locks again.
Keep in mind, some OEMs really bury the Smart Lock menu a few levels deep in advanced security or privacy settings. You may also need to enable Google Play Services as a “trust agent” in the settings of some device to access Smart Lock.
Don’t just monitor data usage—control it
The trick is to receive a warning before you trip your data limit.
In our age of draconian tiered data plans and ever-increasing carrier fees, you often need to watch your mobile data consumption closely. Android has a built-in tool that helps you do this, but most users don’t use it to its full potential. TheData Usage menu is usually near the top of your system settings list (though it may be buried under a “More” heading), and can also be accessed via the network signal strength icon in Quick Settings. You can use the sliders on the usage chart to set your data limits for your chosen billing cycle.
The default behavior is simply to warn you when you reach your data limit. However, by the time you get that warning, it’s often too late to adjust your behavior and avoid overage charges or automatic throttling. A better use of the data tracking feature is to set your warning a few hundred megabytes below your limit, then enable a data limit with the checkbox right above the chart. The red line on the chart lets you set a point at which your mobile data will be shut off.
Use Wi-Fi Direct for quick file transfers
The SuperBeam app facillitates device-to-device file transfers at warp speed—even 45 Mbps. Ah, the wonders of Wi-Fi.
Transferring files between devices has always been a little annoying, but features like Android Beam made it easier: Just hold together two NFC-enabled devices (Android 4.1 or later), and you can transfer files across a Bluetooth link. It’s a neat trick, but transfer speeds are capped by Bluetooth bandwidth, and file type support is limited. Luckily, however, most Android devices also support Wi-Fi Direct, even though Google’s stock apps don’t make use of it.
Wi-Fi Direct is exactly what it sounds like: a protocol that can create a direct connection between two devices via Wi-Fi. You just need an app to make use of it, and there are several in Google Play. SuperBeam is probably the most powerful, and it has a free version. To get a transfer going, you just share files to Super Beam (or whatever app you’ve chosen to use) and tap phones. Wi-Fi Direct allows you to queue up multiple files in a single operation and the transfer rate can easily exceed 30 Mbps. It’s fabulous for sharing large videos or images.
An Android tablet is not a computer. An Android phone is not a computer. Sure, it’s technically a computer, but so is your microwave. You may consider yourself an old hand at using computers, but mobile devices have their own unique way of doing things. Understand these seven basic items, and you’ll be well on your way to becoming more familiar and comfortable with your new Android gizmo.
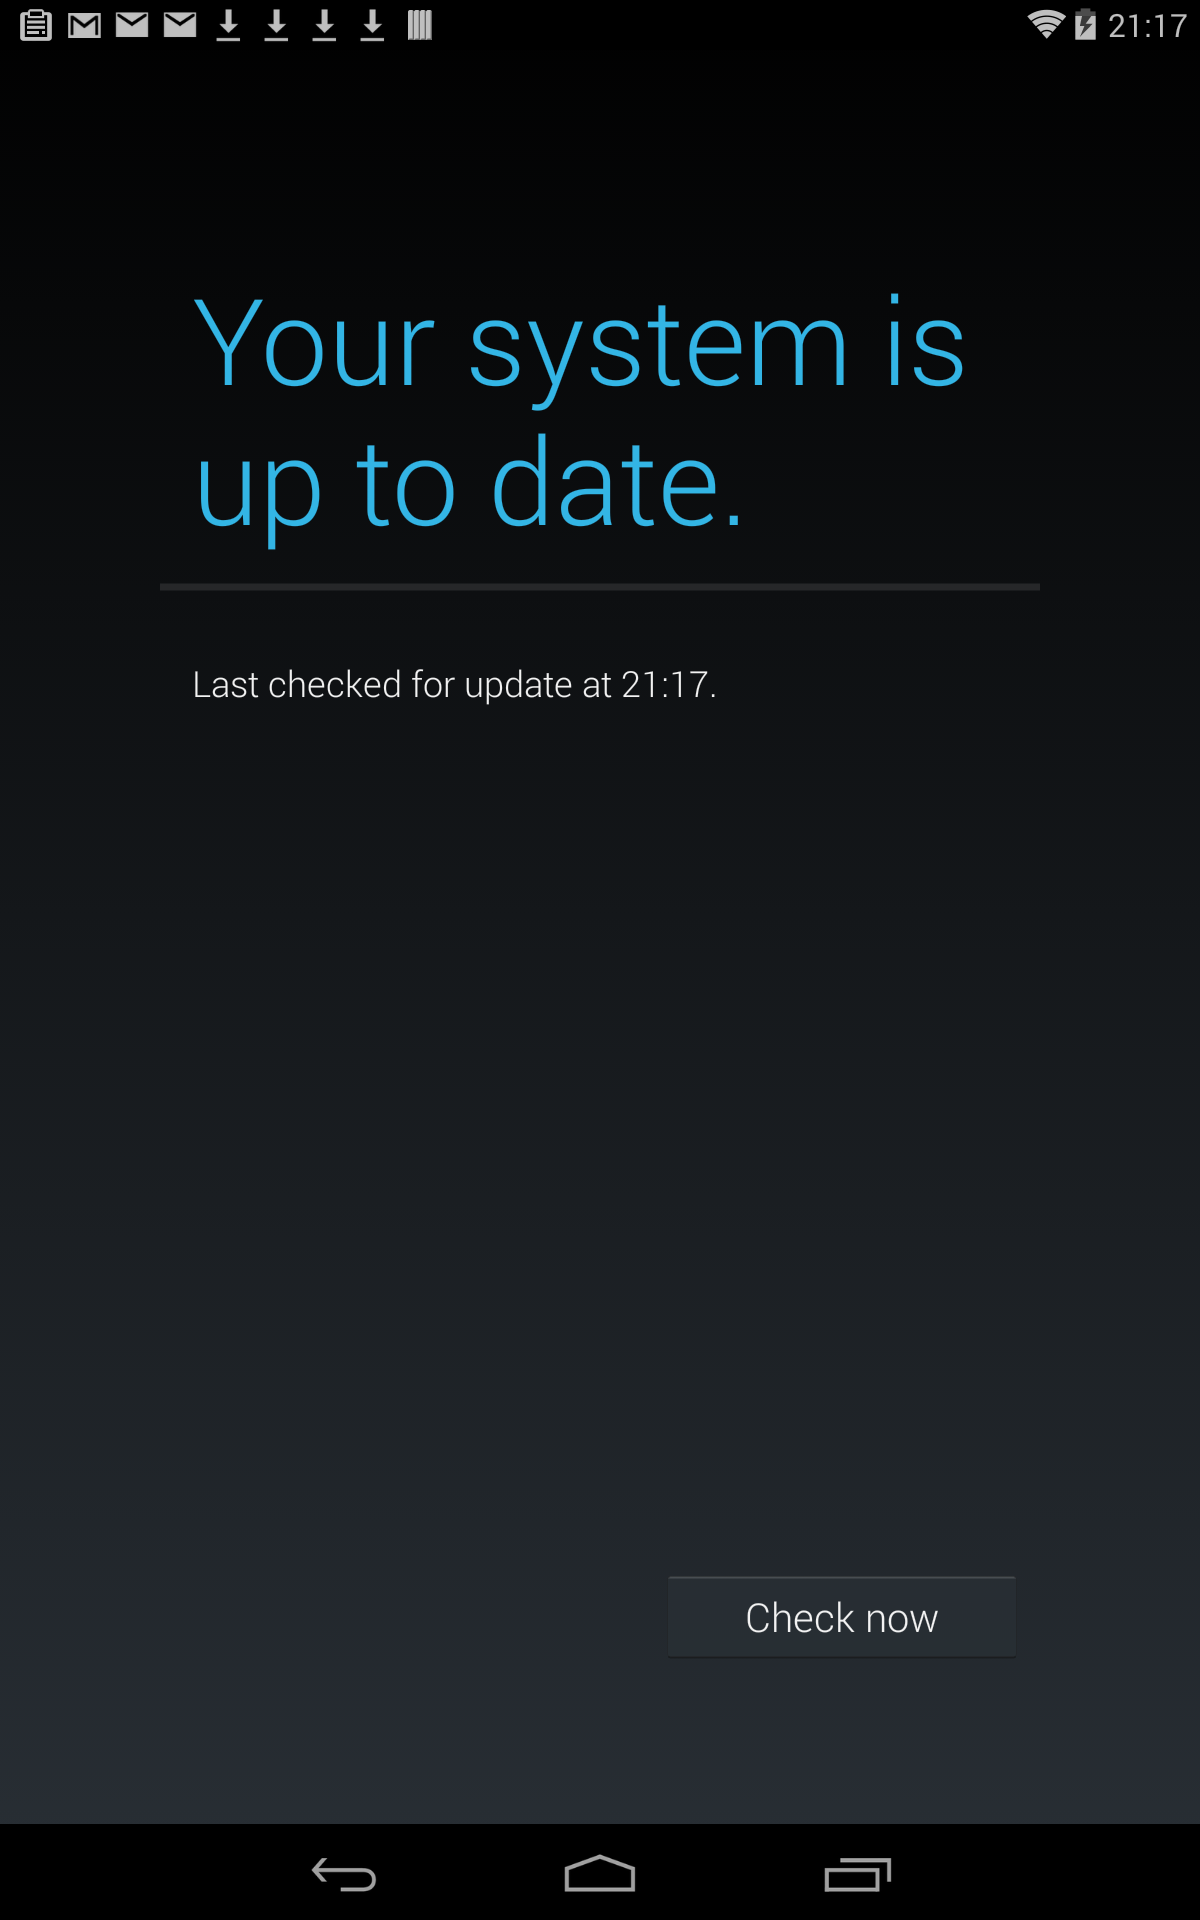
You aren't in control of Android upgrades
Your phone updates itself, when it wants to. Trying to force it is a fool’s errand.
Oh sure, you can try to update your phone's operating system: A command buried in the Settings app makes it appear that you can check for Android operating system updates: Choose About Phone or About Device, then choose System Update or Software Update. Tap away at the Check Now command to your heart’s content. It’s notreally doing anything useful—it’s merely a coincidence if the operation actually works.
Unlike a computer, you are not in charge of updates for your Android device. That job is handled by your phone/tablet manufacturer or your cellular provider. Historically speaking, updates are infrequent. Apps are updated all the time, and you see notification icons to that effect. When it comes to upgrading the operating system, however, you are not in the driver’s seat.
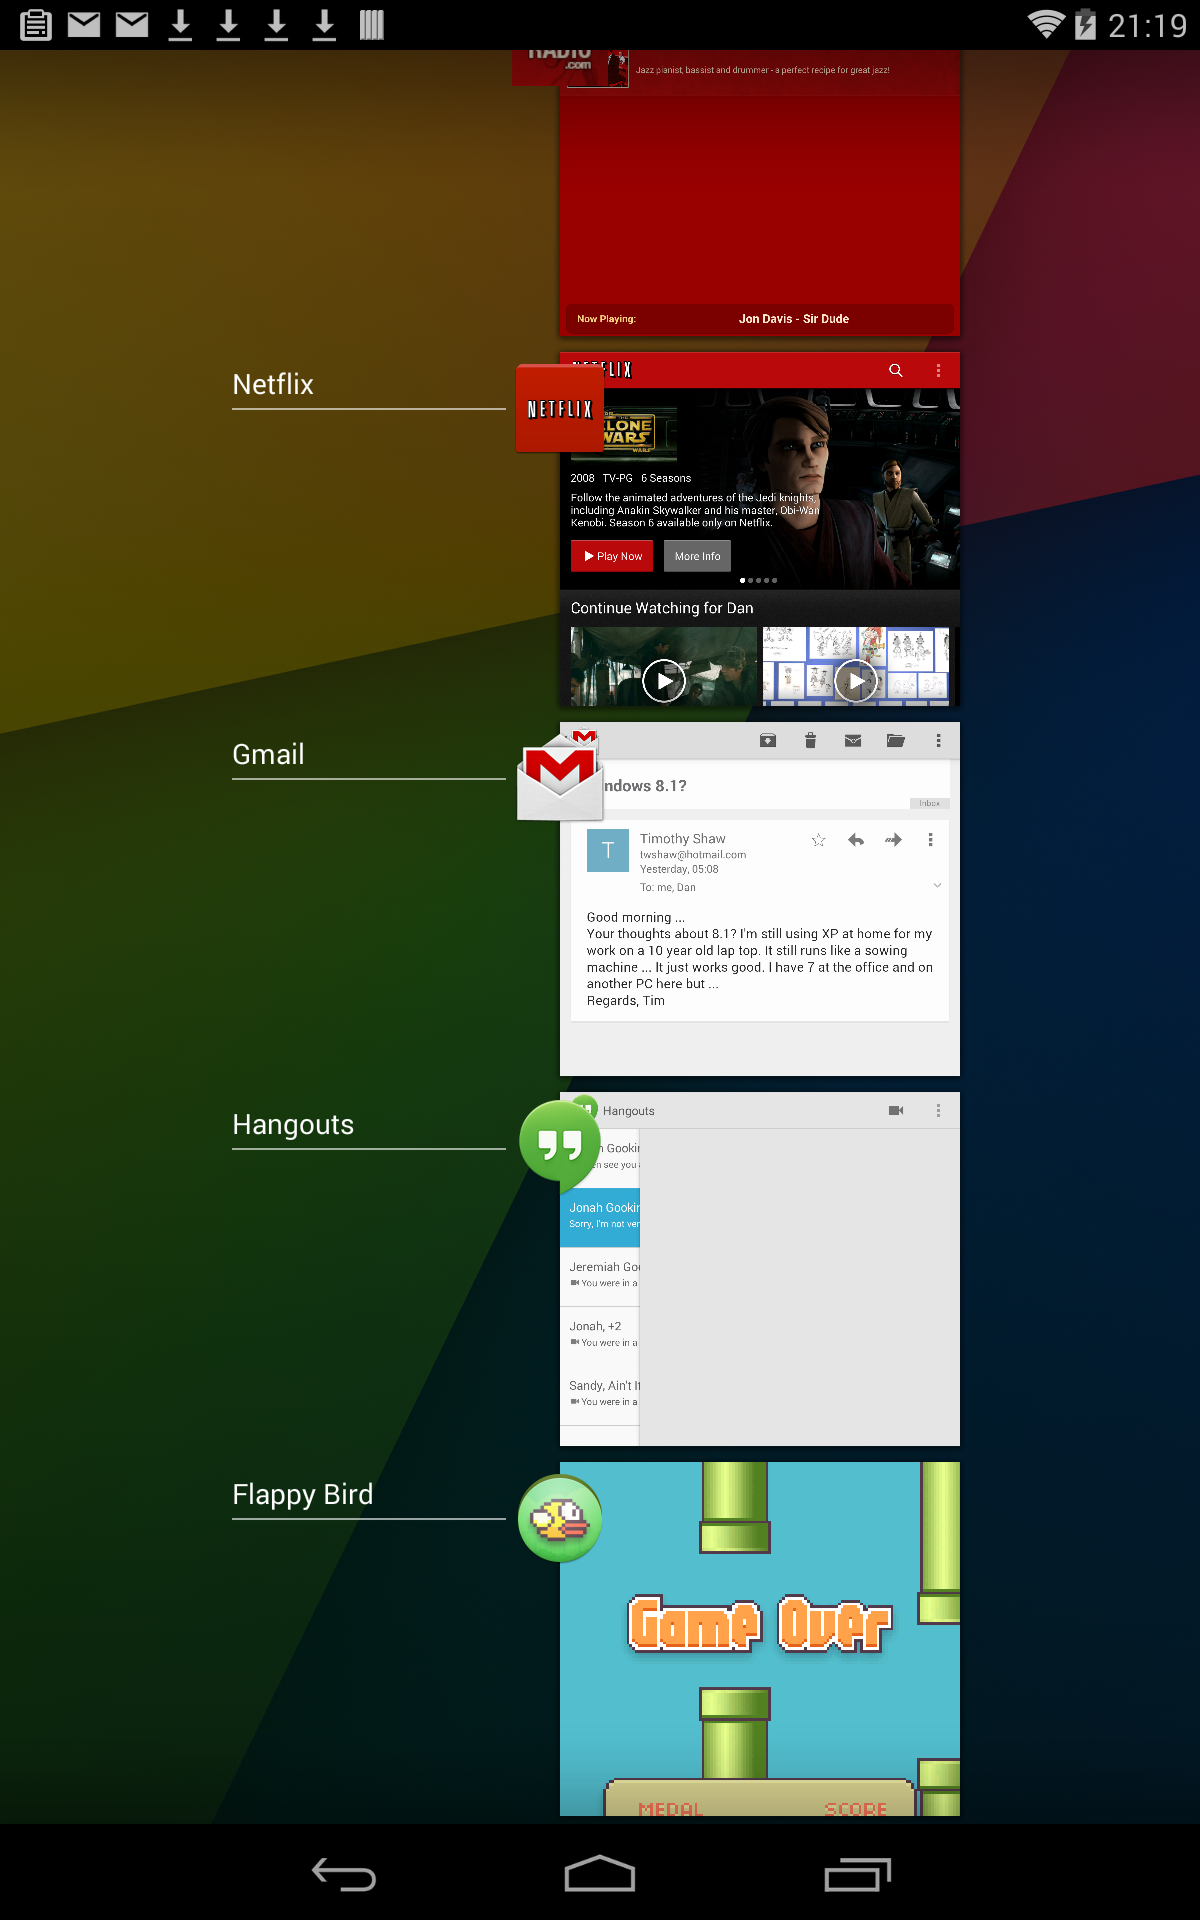
Apps quit on their own
Touch the Recent icon to see running apps. On devices without this icon, long-press the Home icon or button.
One thing that surprises most new Android users is that apps lack a Quit or Exit command. Instead of quitting, you tap the Home icon or switch to another app form the Recent apps list. So how do you quit an app? Short answer: You don’t!
The Android operating system manages apps for you. If you neglect an app for a while, or another app requests more resources, then the operating system stops an app. Otherwise, you don’t need to worry about starting too many apps or running out of memory.
Use the Recent list to switch between running apps.
Newsletter
Get the latest news, trends, apps, and tips for your Android phone.
Get our Greenbot download newsletter
If you really want to stop an app, you can double-tap the home button, then when the recent apps screen appears (above), swipe the app to the side to kill it.
Android devices are about sharing
The ubiquitous Share icon.
On a computer, you start a program and then choose a file to work with or attach. On an Android device, you look at the item that you want to save or send, and then you share it by touching the Share icon.
For example, to email a photo you first open an app where you can view the photo. Tap the Share icon, then choose an app to send, edit, or save the photo. Use that app to complete the operation, such as sending the photo as an email attachment. Printing works the same way: View the photo then choose which app to use for printing.
“Share” doesn’t always mean “post on social media or send to other people.” You might share a video with a cloud storage app to archive it, or share a webpage with an offline reading app like Pocket to save it for later.
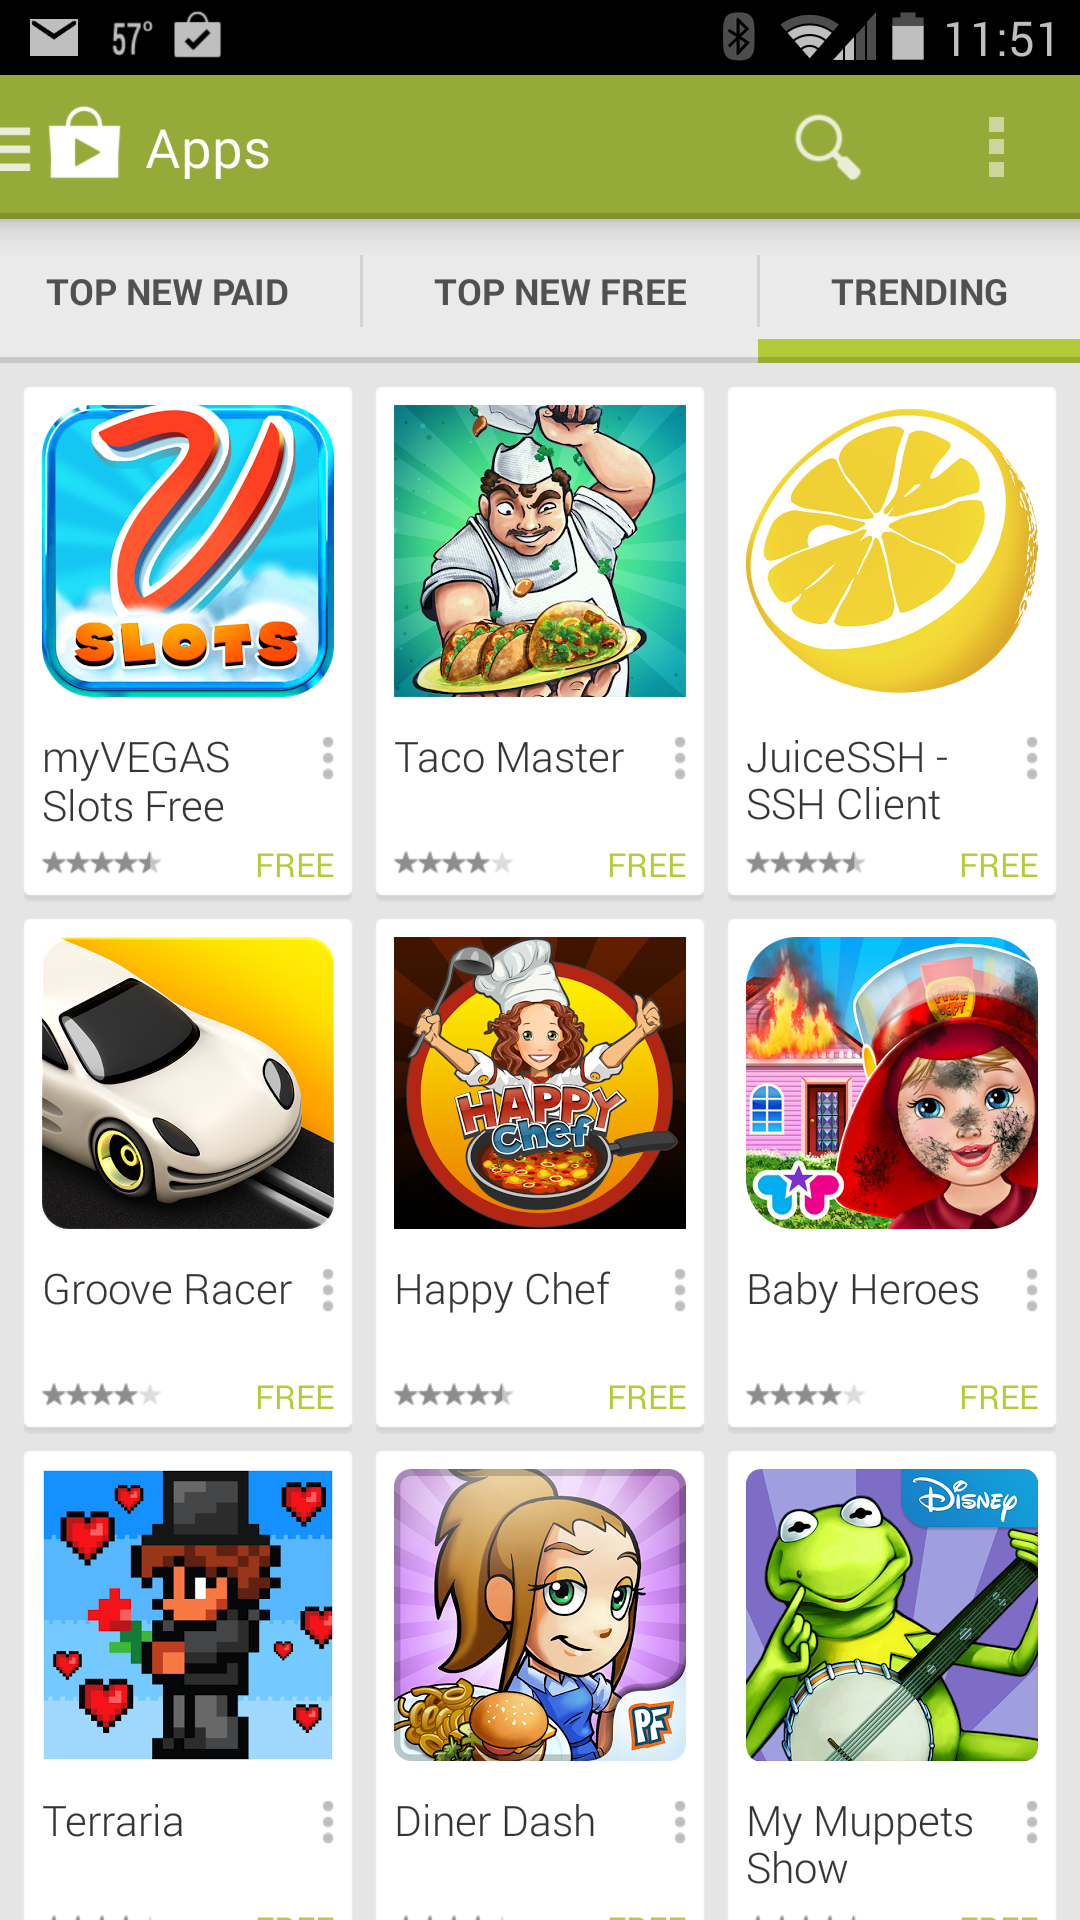
Acquire apps from the Google Play store
Find apps at the Play Store.
Apps (along with movies/TV, music, and books/magazines) are obtained from the Google Play Store by using the Play Store app. Sure, there are other ways to get apps (including “sideloading” and other app stores like the Amazon Appstore), but for beginners, it’s best to stick to the Google store. Browse or search for something you desire. Choose a free app or buy one. That app is then downloaded and installed on your phone or tablet. If you delete it, don't worry; the app is still attached to your account, and you can download it again in the future without paying.
Best of all, you can go to the Google Play website to shop from any computer. If you log in with the same Google account you use on your phone, you can get the app from your laptop and, within seconds, it should start downloading on your phone.
Forget about Flash
The missing plug-in warning is a sure sign that you’ll be missing some Flash content.
The Internet is full of Flash-based webpages or sites that use Flash extensively. It’s fun, it’s useful, and it’s something you’ll access only from a computer. That’s because mobile devices like your Android phone or tablet disable Flash on the web. There’s no way around this restriction, either: Browser apps that promise to display Flash sites are most likely not what they pretend to be.
In some cases, flash content on the web can be delivered by obtaining a specific app, such as the YouTube or Hulu Plus apps. Otherwise, trying to access a Flash-based site is merely an exercise in frustration.
You can customize the Home screen
A single monster widget dominates this Home screen page.
It is with unbridled glee that you can remove, re-arrange, and organize your device’s Home screen. Feel free to cast off the various preset apps and widgets. Yes, they look inviting, sexy, cool. When you don’t use them—especially those monster widgets that consume an entire screen—tap-and-hold on them and then drag them up to the word Remove at the top of the screen. You’re then free to festoon the Home screen with apps and widgets that you actually need.
Don’t feel any emotional attachment toward those discarded widgets or apps, either: Anything you remove from the Home screen can be re-attached later, if you like. They’re all sitting there in the main Apps listing. To add new apps to your home screen, just tap-and-hold on them in the Apps listing, and drag them up to the home screen where you want them. You can even put the same app in multiple folders or on multiple screens.
You can hide pre-installed apps
Manufacturers and cellular providers love to pepper your mobile device with all sorts of apps, many of which you’ll never use. Not only can you remove them from the Home screen, you can often hide them in the Apps drawer.
Many Android devices let you create folders in the Apps drawer. Use those folders to collect and store the pre-installed, trial, or junk apps that you cannot otherwise uninstall. By dragging those icons into a folder you can effectively and cheerfully avoid them.
Alas, not every Android device lets you create folders in the Apps drawer. Coincidentally, it seems like those that do are also the devices with a cumbersome amount of pre-installed apps. Weird, huh?
How to fix your Android phone’s terrible battery life
It’s the early afternoon, and your Android phone is already running on “E.” What’s the deal? A smartphone is supposed to be the hub of your digital life, but it can’t do that very well when the battery has run dry, can it?
You probably shouldn’t wait until your phone has failed you at a critical moment before you figure out what’s destroying your battery life—there’s no better time than now to track down the culprit. If you're lucky, you might even be able to fix the issue without sacrificing functionality.
Wakelocks and misery
Android has gotten much better at managing background processes in the last few years. Anyone who has used Google's platform since the early days can tell you how bad things used to be when “task killers” were a necessity. Even though Android as a whole isn't subject to the same horrible battery life issues, the wrong combination of apps can still break Android’s elegant process management scheme.
Conventional wisdom used to be that you should open the multitasking interface and kill any application you’re not using to save battery life, and unfortunately this superstition still persists. But Android knows how to manage background tasks, and swiping apps out of the multitasking interface only closes the foreground process. If an app is indeed causing issues, it's usually the background process that's doing it. This sort of micromanagement will only waste time.
The stock Android battery use menu can be helpful, but it only tells part of the story. Most apps show up here because you're actually using them a lot—that's to be expected. This menu merely shows you the system process and app packages that are using juice, but the 'Awake' and 'Screen on' lines are the most important. If you have a lot more awake time than screen on, something might be keeping your phone from sleeping. This is called a wakelock, and it's the number one enemyof your battery life.
When an app or service needs to run a process, it can wake the device with an alarm. The wakelock mode keeps the CPU awake so the app can do its business. This is usually no big deal: the app finishes up, and the device slips back into deep sleep. Conflicts and bugs can cause wakelocks to persist, essentially keeping your phone from sleeping at all. In order to figure out what's messing with the battery, we need to find the root cause of this baffling case of smartphone insomnia.
Solving the case
It might not be immediately obvious that a phone is in wakelock for long periods. By all appearances, the screen is off and it seems to be asleep like it should be. One clue that something is going wrong is excess heat generation. When the CPU is cranked up instead of in deep sleep, the device might be noticeably warmer than usual when you pick it up. You'll need to do a little detective work, though, and that's where the apps come in handy.
One quick and easy way to watch for a phone that won't sleep is to use an app like System Monitor to track CPU clock speed. This app breaks down CPU activity as a percentage. Unless you've been using the device almost constantly, ”Deep Sleep” should be the largest part of the chart. If not, you've probably got a misbehaving app or system process.
***More often than not, the root of your problem will be some app you installed. The easiest way to deal with the issue is to leave the offending app or game uninstalled, but maybe you actually want to use the app despite its battery sucking behavior. In that case, you need a way to end the process safely. Android has a built-in way of hibernating processes, and you can easily trigger it with an app called Greenify.
Simply use Greenify to identify the problematic apps, and hit the hibernate button after you're done using them. Greenify works best with root access—it can handle all this in the background. For non-rooted devices, you can use the in-app button or a widget to manually trigger the hibernation routine.